本文是关于Python中的Spider的小Demo,通过Python的scrapy爬取学堂在线课程的相关数据。

一、编译环境:

点击查看
1
2
3
4
5
6
7
8
9
10
11
12
13
14
15
16
17
18
19
20
21
22
23
24
25
26
27
PyCharm 2019.3.4 (Professional Edition)

Build #PY-193.6911.25, built on March 18, 2020

Runtime version: 11.0.6+8-b520.43 amd64

VM: OpenJDK 64-Bit Server VM by JetBrains s.r.o

Windows 10 10.0

GC: ParNew, ConcurrentMarkSweep

Memory: 725M

Cores: 8

Registry: ide.balloon.shadow.size=0

Non-Bundled Plugins:

GrepConsole,Statistic,cn.yiiguxing.plugin.translate,com.chrisrm.idea.MaterialThemeUI,com.notime.intellijPlugin.backgroundImagePlus,com.wakatime.intellij.plugin,izhangzhihao.rainbow.brackets,mobi.hsz.idea.gitignore, net.vektah.codeglance, org.intellij.gitee

Python Version:3.7(Anaconda3)

Package:

scrapy==2.0.1

二、详细步骤

①准备工作

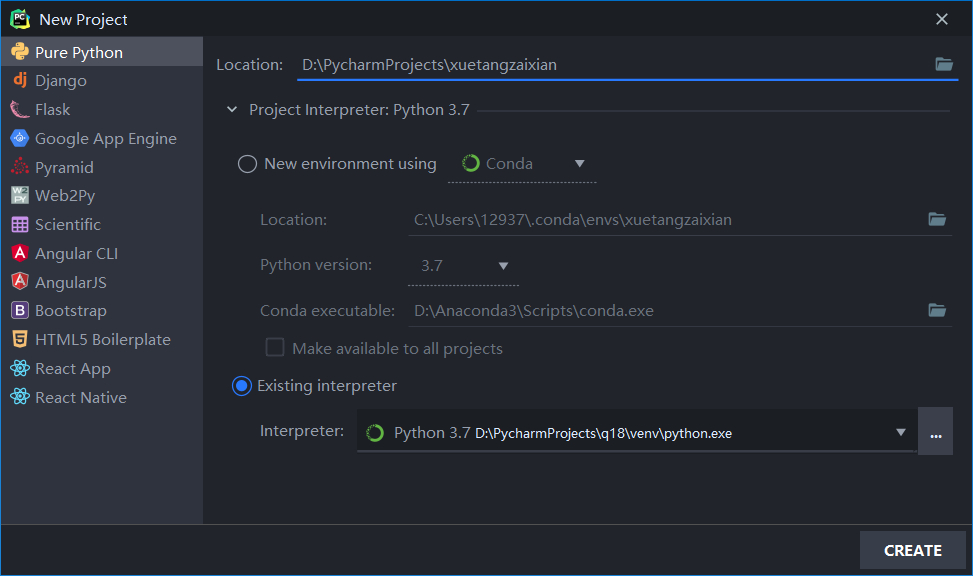
  1. 在Pycharm中新建一个Pure Python项目(记得要按照一中的要求配好Python环境)。
2020-04-07_214715
  1. 打开Pycharm的下方的终端(Terminal),当然这些也可以在系统终端里操作,不过可能需要的步骤多一些,还是直接在Pycharm里方便一些。
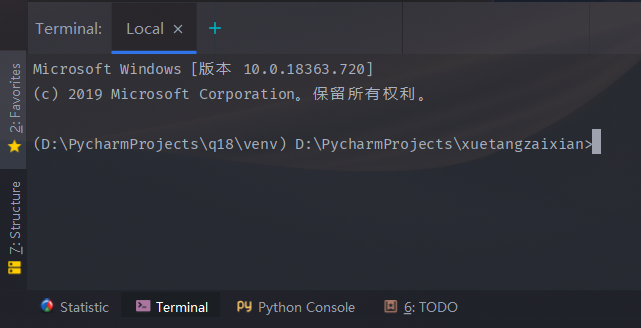
2020-04-08_164744

  1. 在终端里输入

    1
    scrapy startproject myScrapy

    本来是可以在我们刚刚创建的项目里新建一个名为“myScrapy”的scrapy项目的,但是不知道为什么竟然报错了:

    2020-04-08_190330

    这是什么奇奇怪怪的错误,我都没有“d:\bld\scrapy_1584555997548_h_env\python.exe”这个目录,经过查找相关问题的资料,问题可能是出在Python环境上,因为我上一次新建项目时并没有报错,这一次我直接用的上一个项目的环境,网上还有一种说法是Scrapy的bug,详见

    Fatal error launching scrapy>1.6.0 from Anaconda Prompt

    Issue with conda-forge scrapy>1.6.0 on Windows

    目前找到了两种解决方案:

    1. 把python环境复制到报错的那个目录(d:\bld\scrapy_1584555997548_h_env\python.exe),然后在创建scrapy项目,但这个解决方法有点愚蠢,就没有采用。

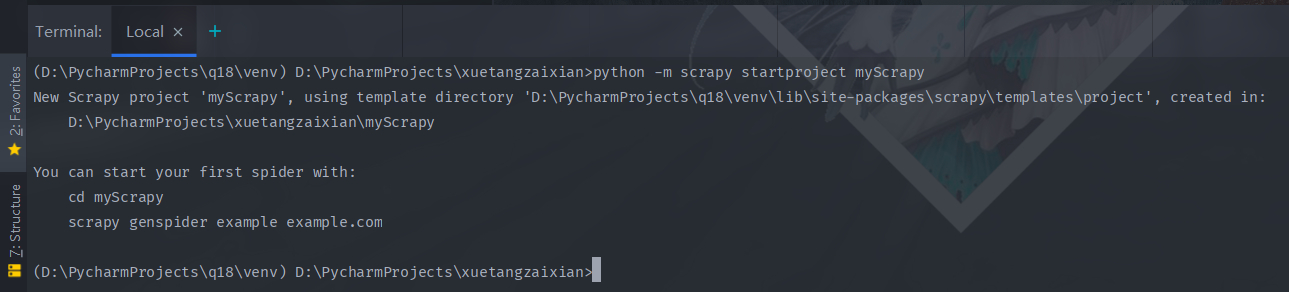
    2. 在scrapy命令前面添加“python -m”选项:

      1
      python -m scrapy startproject myScrapy

      就可以正常创建了。

      关于Python的-m选项,官方给出的解释是“run library module as a script”,简单来说就是将库中的Python模块当作脚本去运行。

      特别感谢简书的大佬ccw1078提供的解释,很清晰明了,有兴趣的可以去瞅一下,因为和本文的主题爬虫没啥关系,在这里就不赘述了。

  1. 出现这些提示就代表创建成功了。

    2020-04-08_192151

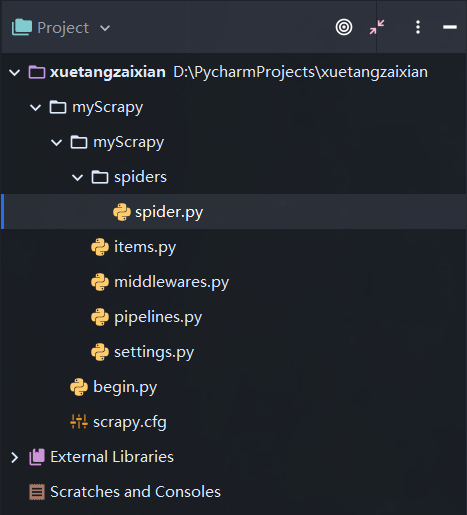
    然后在spiders文件里新建一个spider.py文件,用于写爬虫。

  2. 我们来看一下目前scrapy项目的目录结构。

    2020-04-08_203310

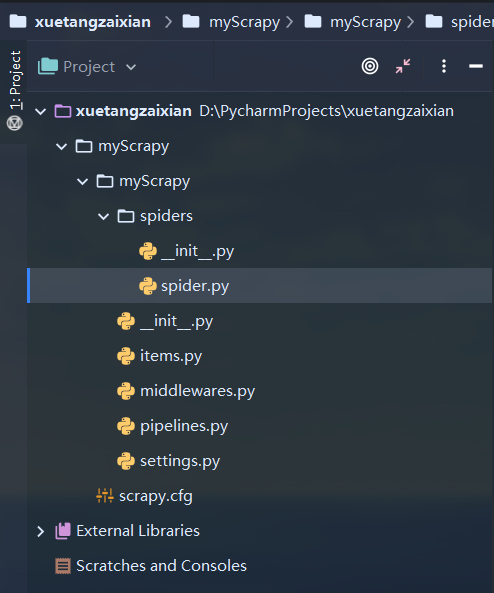
    __init__.py:pycharm生成的文件,简化导入语句用的,可以忽略,没啥用,建议删了,留着可能会出问题。

    spiders:存放你Spider爬虫源文件

    ​ spider.py:代码主要在这里写。

    items.py:数据容器。

    middlewares.py:Downloader Middlewares(下载器中间件)和Spider Middlewares(蜘蛛中间件)实现的地方。

    pipelines.py:项目管道文件,相当于数据中转站。实现数据的清洗,储存,验证。

    settings.py:scrapy的全局配置。

    scrapy.cfg:配置文件。

    scrapy已经帮我们把大体框架写好了,我们主要要修改的文件是spider.py,items.py,pipelines.py,settings.py。

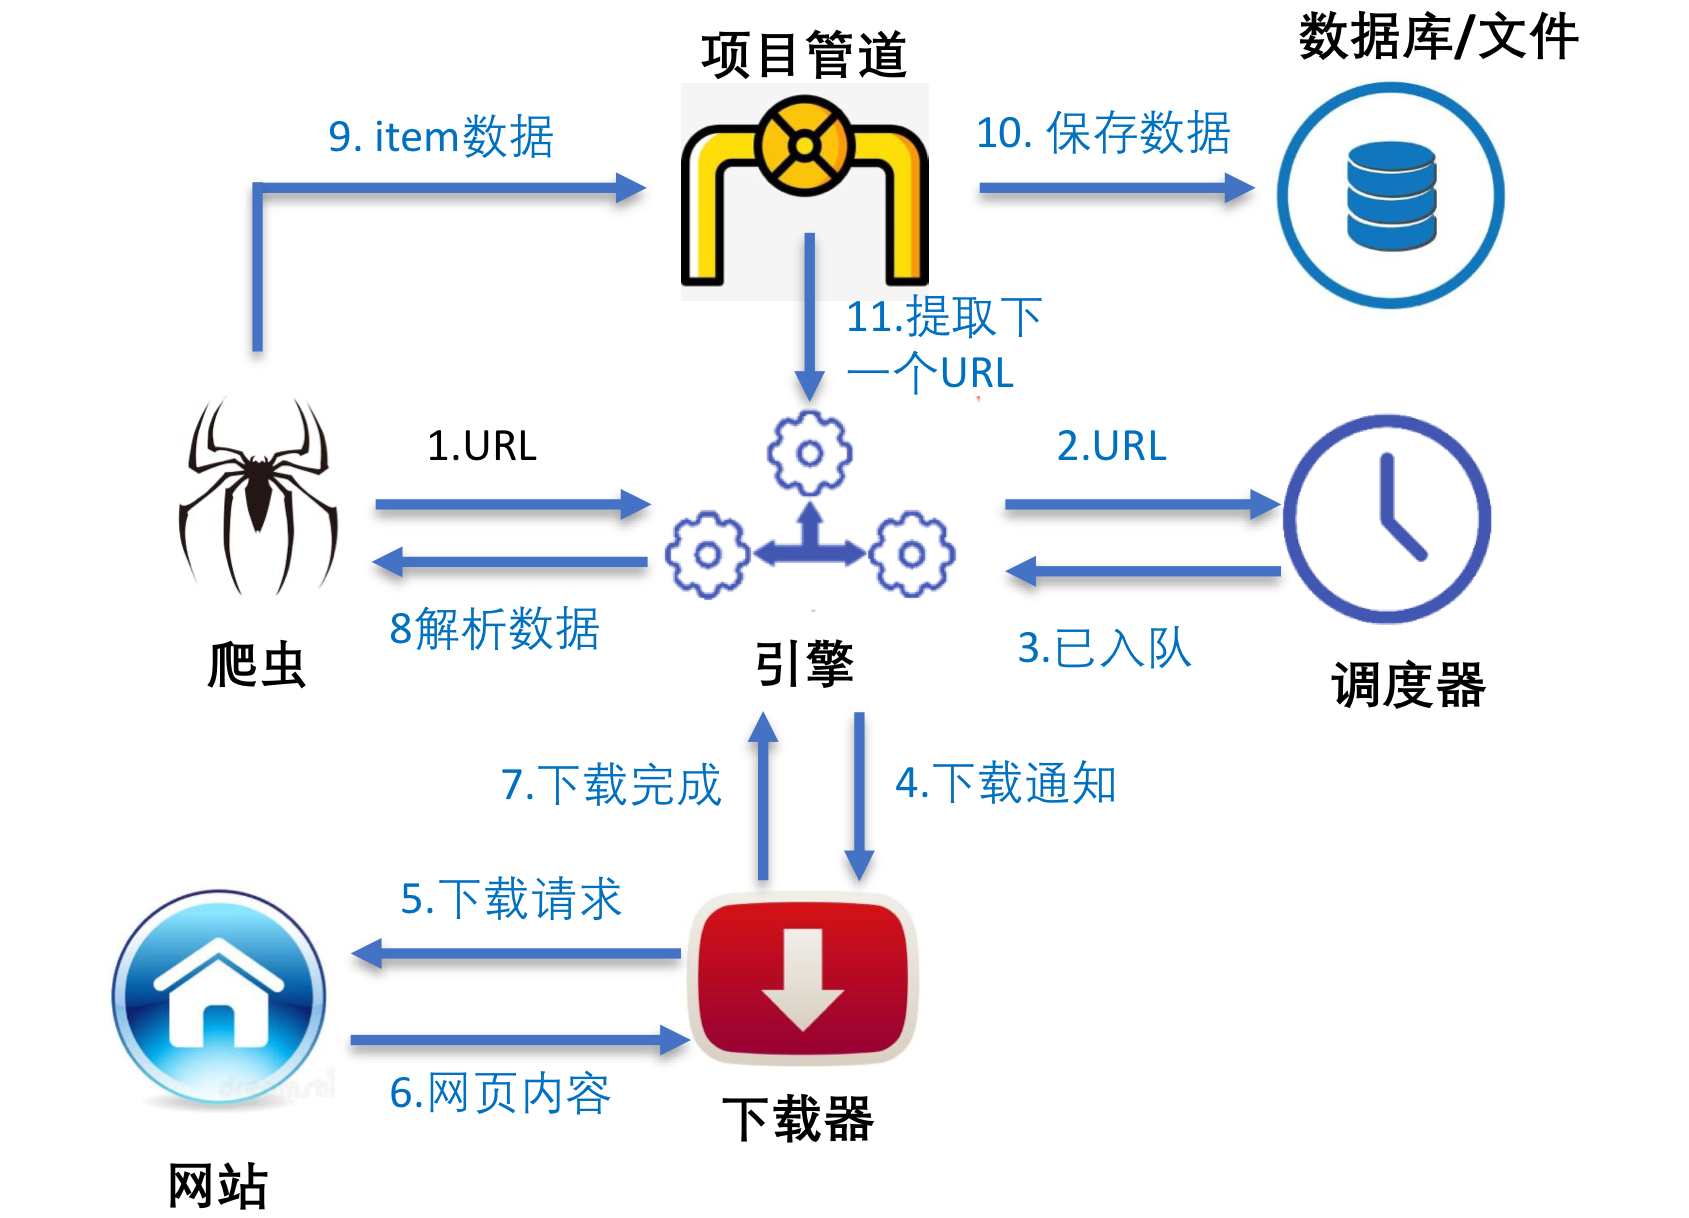
  3. 这是爬虫spider的基本工作方式,想要深入了解的可以去网上查找资料。

scrapy

②开始写代码

1、先来写items.py。

点击查看代码
1
2
3
4
5
6
7
8
import scrapy

class MyscrapyItem(scrapy.Item):
# define the fields for your item here like:
# name = scrapy.Field()
school = scrapy.Field()
num = scrapy.Field()
pass

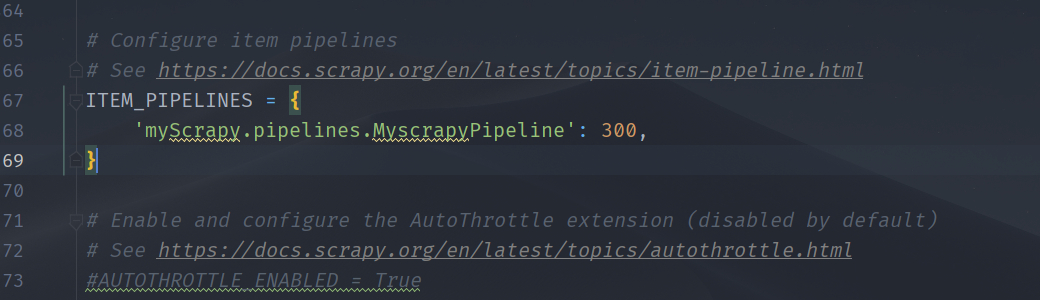
2、再来搞settings.py,这个只需要找到这个注释掉的语句,把#去掉就OK了,就像这样:

2020-04-08_210710

3、pipelines.py就很好写了,基本可以当模板来用。

点击查看代码
1
2
3
4
5
6
7
8
9
10
11
12
13
14
15
16
17
18
import json

class MyscrapyPipeline(object):
def open_spider(self, spider):
try:
# 这个就是爬虫生成的文件,可以支持好多种格式,这里使用的是json文件
self.file = open('MyData.json', 'w', encoding="utf-8")
except Exception as err:
print(err)

def process_item(self, item, spider):
dict_item = dict(item)
json_str = json.dumps(dict_item, ensure_ascii=False) + "\n"
self.file.write(json_str)
return item

def close_spider(self, spider):
self.file.close()

4、spider.py是我们主要写的核心部分。这里需要一些html的xpath相关知识来对项进行定位,可以自行查找相关资料。

点击查看代码
1
2
3
4
5
6
7
8
9
10
11
12
13
14
15
16
17
18
19
20
21
22
23
24
25
26
27
28
29
30
31
32
import scrapy
import re
from myScrapy.myScrapy.items import MyscrapyItem

class mySpider(scrapy.spiders.Spider):
# spider的名字
name = "xuetang"
# 限制spider爬取的域名
allowed_domains = ["www.xuetangx.com/"]
# 爬虫要爬取的网页,是一个列表,按顺序爬取
start_urls = ["http://www.xuetangx.com/partners"]
# 这是一种方式,可以爬取网页中所有的项
# def parse(self, response):
# item = MyscrapyItem()
# for each in response.xpath("/html/body/article[1]/section/ul/*"):
# item['school'] = each.xpath("a/div[2]/h3/text()").extract()
# item['num'] = each.xpath("a/div[2]/p[1]/text()").extract()
# if item['num']:
# item['num'] = re.findall(r'\d+', item['num'][0])
# if item['school'] and item['num']:
# yield (item)
# 这是第二种方式,使用for循环,制定爬取项的数目
def parse(self, response):
item = MyscrapyItem()
for i in range(1, 144):
item['school'] = response.xpath \
("/html/body/article[1]/section/ul/li[{}]/a/div[2]/h3/text()".format(i)).extract()
item['num'] = response.xpath \
("/html/body/article[1]/section/ul/li[{}]/a/div[2]/p[1]/text()".format(i)).extract()
# 判断爬取的项目是否为空,把非空的项目提交
if item['school'] and item['num']:
yield (item)

③可以开始运行啦

1、在运行前要先在项目根目录下建立一个begin.py文件来控制scrapy爬虫的运行。

2020-04-08_212604
点击查看代码
1
2
3
from scrapy import cmdline
# "xuetang"是我们上面spider.py中定义的爬虫名
cmdline.execute("scrapy crawl xuetang".split())

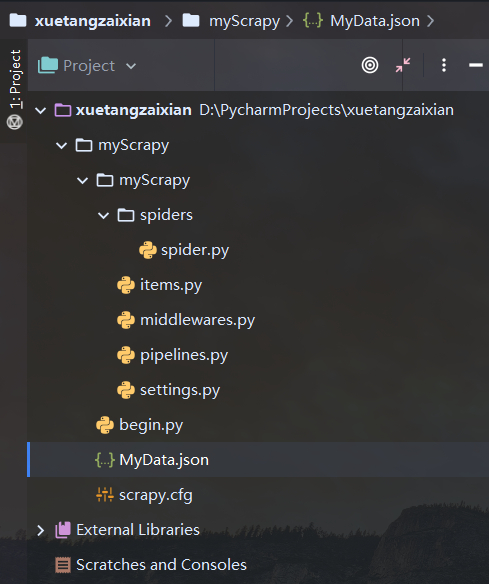
2、最终的项目结构(__init__.py没啥用,删了):

2020-04-08_212834

3、运行begin.py就可以开始爬虫了。

2020-04-08_212946

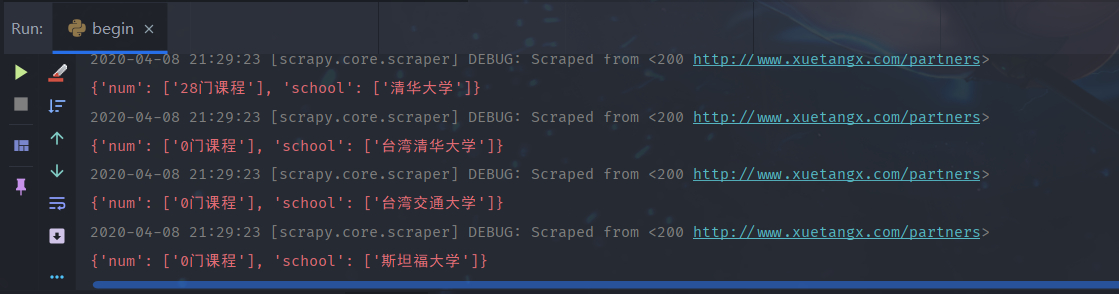
出现这些提示就表示成功了,运行完毕后会发现项目根目录出现了我们在pipelines.py中设置好的MyData.json。

2020-04-08_222333

4、打开MyData.json看一下,Perfect!

2020-04-08_222417

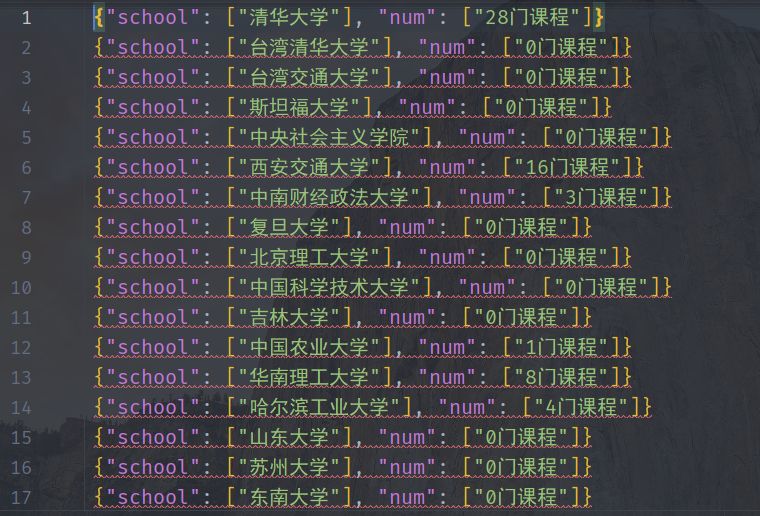
有了这个json文件,我们就可以利用Python的pandas、numpy等工具进行各种处理,然后用matplotlib等模块进行画图了。

三、总结

本文只是对Python的scrapy爬虫进行了简单的介绍和用一个小Demo讲述了如何使用scrapy爬取网页数据,希望对你有所帮助。

四、项目地址

本项目的源码、可执行程序均已经存放于我的Github,欢迎下载查看:

评论


博客内容遵循 署名-非商业性使用-相同方式共享 4.0 国际 (CC BY-NC-SA 4.0) 协议

载入天数...载入时分秒...